
Science Week 26th June 2023
Each year in school we participate in science week by focusing much of our learning around science! This year our science week begins on 26th June. The week starts with an assembly showing children some simple science experiments they can do at home. In these assemblies we have made lava lamps, a human circuit, hovercrafts and investigated colour using skittles! We challenge the pupils to try a science experiment at home. It could be one that they have seen in school but there are hundreds on the internet you could try. Below is a number of easy experiments to try.
Once they have found an experiment to try, complete the given form and take a/some pictures of your experiment and return it to Mr Clarke by the end of science week!
Some experiments to try:
Rainbow Skittles science experiment
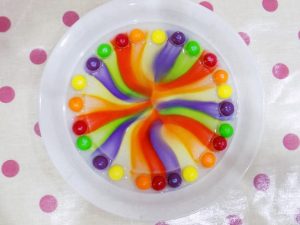
You will need
1 pkt Skittles
1/4 cup warm water
white plate
Arrange the Skittles in a single row coloured pattern around the edge of the plate.
Pour over enough warm water to cover all the Skittles and the plate itself.
Watch and wait as a rainbow appears on the plate, the colours will move towards the middle and create a whirl of colour.
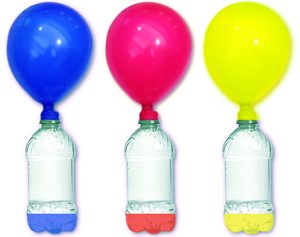
How to make a CD balloon hovercraft
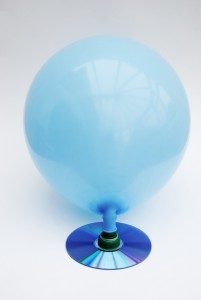
You will need
1 x balloon
1 x CD
1 x pop-up water bottle lid
superglue or a hot glue gun
Activity
Glue the water bottle lid to the CD, so that the two holes match up – i.e. the opening of the lid should sit over the central hole in the CD.
Now push the pop-up lid to the closed position.
Blow up the balloon. Without letting it deflate (tricky) stretch the opening of the balloon over the top of the pop-up lid – just over the push-up bit.
Find a nice big empty space on the floor (tiles or floorboards, it won’t work on carpet) and pull the pop-up lid to the open position. Set the hovercraft on the floor and watch it slide around.
Rain cloud in a jar science experiment
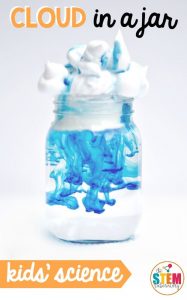
What you need
1 x jar
tap water
shaving foam
blue food colouring
pipette or glass dropper (if your food colouring doesn’t have one)
Activity
Fill your jar about three quarters full with water from the tap.
Use the shaving foam to create a cloud on top of the water.
Let the foam settle a bit.
Now drop food colouring into the ‘cloud’. As your cloud fills up, the food colouring will fall down into the water creating a rain-like effect.
How do clouds work?
Clouds are formed when water vapour rises into the air. When the vapour hits cold air, it turns back into droplets of water. Those tiny drops of water floating in the air collect and “stick” together to form clouds. When clouds get so full of water that they can’t hold any more, the water falls back to the ground as rain.
A Density Experiment You Can Drink!
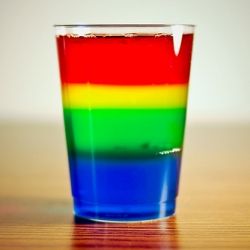
You will need:
Juices that have different density levels. The density of a juice is often determined by how much sugar or fruit is in it – the more sugar or fruit, the more dense the juice is. Powdered and canned juices do not work well for this experiment since they are almost entirely water. You will have to do some experimentation to find juices that are colourful and give a nice display of density, and that’s half the fun.
A narrow glass (the more narrow it is, the easier it is to separate the density levels)
Eye dropper or turkey type baster.
What to do:
- Before you begin, you can guess which juices you think will be more dense and form a hypothesis of how the levels of your Drink of Density will turn out. Check the number of ingredients, the sugar content, and the water content to help you out.
- In order to display your density levels, you will need to find out which of your juices are the most and least dense. Pour one of your juices into the narrow glass to fill it about 1 inch (2.5 cm) high. Fill a dropper with another juice and slowly drop it onto the inside of the glass so that it runs down the side of the glass. Watch the juice to see if it goes below or above the juice in there. (if it simply mixes with the juice and does not go above or below, it has the same density as the juice and you will need to move on to your next juice.
- Continue experimenting with other juices to determine which juices go to the bottom (more dense) and which ones go to the top (least dense.)
- Once you have the densities determined, start over with a clean glass and use the dropper for each level to create your final Drink of Density!
BUILD A FIZZ INFLATOR
You will need
One small empty plastic soda or water bottle
1/2 cup of vinegar
Small balloon
Baking soda
Funnel or piece of paper
What to do
- Carefully pour the vinegar into the bottle.
- This is the tricky part: Loosen up the balloon by stretching it a few times and then use the funnel to fill it a bit more than half way with baking soda. If you don’t have a funnel you can make one using the paper and some tape.
- Now carefully put the neck of the balloon all the way over the neck of the bottle without letting any baking soda into the bottle.
- Ready? Lift the balloon up so that the baking soda falls from the balloon into the bottle and mixes with the vinegar. Watch the fizz-inflator at work!
How does it work?
The baking soda and the vinegar create an ACID-BASE reaction and the two chemicals work together to create a gas, (carbon dioxide) Gasses need a lot of room to spread out and the carbon dioxide starts to fill the bottle, and then moves into the balloon to inflate it.
BLOBS IN A BOTTLE
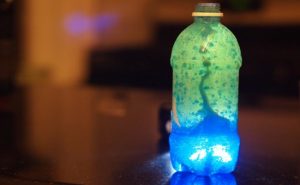
You will need
A clean 1 litre clear soda bottle
3/4 cup of water
Vegetable Oil
Fizzing tablets (such as Alka Seltzer)
Food colouring
What to do
- Pour the water into the bottle.
- Use a measuring cup or funnel to slowly pour the vegetable oil into the bottle until it’s almost full. You may have to wait a few minutes for the oil and water separate.
- Add 10 drops of food colouring to the bottle (we like red, but any colour will look great.) The drops will pass through the oil and then mix with the water below.
- Break a seltzer tablet in half and drop the half tablet into the bottle. Watch it sink to the bottom and let the blobby greatness begin!
- To keep the effect going, just add another tablet piece. For a true lava lamp effect, shine a flashlight through the bottom of the bottle.
How does it work?
To begin, the oil stays above the water because the oil is lighter than the water or, more specifically, less dense than water. The oil and water do not mix because of something called “inter molecular polarity.” That term is fun to bring up in dinner conversation. Molecular polarity basically means that water molecules are attracted to other water molecules. They get along fine, and can loosely bond together (drops.) This is similar to magnets that are attracted to each other. Oil molecules are attracted to other oil molecules, they get along fine as well. But the structures of the two molecules do not allow them to bond together. Of course, there’s a lot more fancy scientific language to describe density and molecular polarity, but maybe now you’ll at least look at that vinaigrette salad dressing in a whole new way.
When you added the tablet piece, it sank to the bottom and started dissolving and creating a gas. As the gas bubbles rose, they took some of the coloured water with them. When the blob of water reached the top, the gas escaped and down went the water. Cool, huh? By the way, you can store your “Blobs In A Bottle” with the cap on, and then anytime you want to bring it back to life, just add another tablet piece.
FANTASTIC FOAMY FOUNTAIN
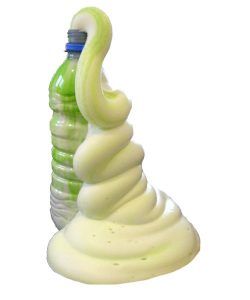
You will need
A clean 16 ounce plastic soda bottle
1/2 cup 20-volume hydrogen peroxide liquid (20-volume is a 6% solution, ask an adult to get this from a beauty supply store or hair salon)
1 Tablespoon (one packet) of dry yeast
3 Tablespoons of warm water
Liquid dish washing soap
Food colouring
Small cup
Safety goggles
NOTE: The foam will overflow from the bottle, so be sure to do this experiment on a washable surface, or place the bottle on a tray.
What to do
- Hydrogen peroxide can irritate skin and eyes, so put on those safety goggles and ask an adult to carefully pour the hydrogen peroxide into the bottle.
- Add 8 drops of your favourite food colouring into the bottle.
- Add about 1 tablespoon of liquid dish soap into the bottle and swish the bottle around a bit to mix it.
- In a separate small cup, combine the warm water and the yeast together and mix for about 30 seconds.
- Now the adventure starts! Pour the yeast water mixture into the bottle (a funnel helps here) and watch the foaminess begin!
How does it work?
Foam is awesome! The foam you made is special because each tiny foam bubble is filled with oxygen. The yeast acted as a catalyst (a helper) to remove the oxygen from the hydrogen peroxide. Since it did this very fast, it created lots and lots of bubbles. Did you notice the bottle got warm. Your experiment created a reaction called an Exothermic Reaction – that means it not only created foam, it created heat! The foam produced is just water, soap, and oxygen so you can clean it up with a sponge and pour any extra liquid left in the bottle down the drain.
This experiment is sometimes called “Elephant’s Toothpaste” because it looks like toothpaste coming out of a tube, but don’t get the foam in your mouth!
MAKE A BALLOON ROCKET
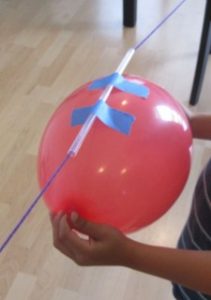
You will need
1 balloon (round ones will work, but the longer “airship” balloons work best)
1 long piece of kite string (about 10-15 feet long)
1 plastic straw
tape
What to do
- Tie one end of the string to a chair, door knob, or other support.
- Put the other end of the string through the straw.
- Pull the string tight and tie it to another support in the room.
- Blow up the balloon (but don’t tie it.) Pinch the end of the balloon and tape the balloon to the straw as shown above. You’re ready for launch.
- Let go and watch the rocket fly!
How does it work?
So how does it work? It’s all about the air…and thrust. As the air rushes out of the balloon, it creates a forward motion called THRUST. Thrust is a pushing force created by energy. In the balloon experiment, our thrust comes from the energy of the balloon forcing the air out. Different sizes and shapes of balloon will create more or less thrust. In a real rocket, thrust is created by the force of burning rocket fuel as it blasts from the rockets engine – as the engines blast down, the rocket goes up!
HOW TO MAKE SLIME
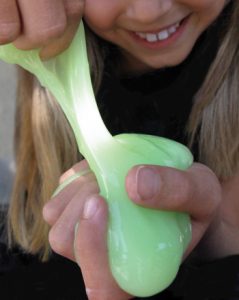
What to do
Pour all of the glue into the mixing bowl.
Pour all of the water to the mixing bowl with the glue.
Stir the glue and water together.
Add your food color now – about 6 drops should do it.
Now add the liquid starch and stir it in.
It should be nice and blobby by now. As you play with your slimy concoction, it will become more stretchy and easier to hold.
Explore your slimy creation and store it in a zip bag when you are not using it.
How does it work?
The glue is a liquid polymer. This means that the tiny molecules in the glue are in strands like a chain. When you add the liquid starch, the strands of the polymer glue hold together, giving it its slimy feel. The starch acts as a cross-linker that links all the polymer strands together.
MAKE AN ELECTROMAGNET
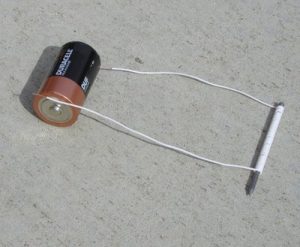
You will need
A large iron nail (about 3 inches)
About 3 feet of THIN COATED copper wire
A fresh D size battery
Some paper clips or other small magnetic objects
What to do
- Leave about 8 inches of wire loose at one end and wrap most of the rest of the wire around the nail. Try not to overlap the wires.
- Cut the wire (if needed) so that there is about another 8 inches loose at the other end too.
- Now remove about an inch of the plastic coating from both ends of the wire and attach the one wire to one end of a battery and the other wire to the other end of the battery. See picture below. (It is best to tape the wires to the battery – be careful though, the wire could get very hot!)
- Now you have an ELECTROMAGNET! Put the point of the nail near a few paper clips and it should pick them up!
NOTE: Making an electromagnet uses up the battery somewhat quickly which is why the battery may get warm, so disconnect the wires when you are done exploring.
How does it work?
Most magnets, like the ones on many refrigerators, cannot be turned off, they are called permanent magnets. Magnets like the one you made that can be turned on and off, are called ELECTROMAGNETS. They run on electricity and are only magnetic when the electricity is flowing. The electricity flowing through the wire arranges the molecules in the nail so that they are attracted to certain metals. NEVER get the wires of the electromagnet near at household outlet! Be safe – have fun!
ROLL A CAN WITH STATIC ELECTRICITY
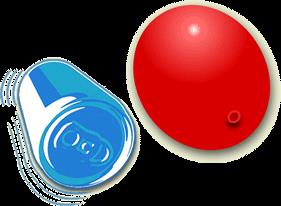
You will need
An empty soda can
blown-up balloon
A head of hair
What to do
- Place the can on its side on a flat smooth surface like a table or a smooth floor.
- Rub the blown up balloon back and forth through your hair really fast.
- Now the fun part – Hold the balloon close to the can without actually touching the can. The can will start to roll towards the balloon without you even touching it!
Try This Too: While you’ve got the balloon out, tear up part of a tissue into tiny pieces about 1/4 inch (.5 cm) big. Rub the balloon in your hair again and bring it close to the tissue pieces. They will be attracted to the balloon and then jump away.
How does it work?
This works a lot like our bending water experiment. When you rub the balloon through your hair, invisible electrons (with a negative charge) build up on the surface of the balloon. This is called static electricity, which means “non-moving electricity” The electrons have the power to pull very light objects (with a positive charge) toward them – like the soda can.
Make A Static Powered Dancing Ghost
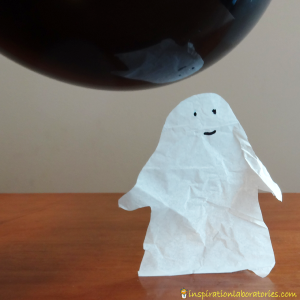
For this bit of spooky science you will need:
A piece of tissue paper
A balloon
Scissors
A head of hair
- First cut out a ghost shape in the tissue as shown about 1.5 inches (4 cm) long and add some eyes with a marker. If you are using 2-ply tissues, peel apart the 2 layers to get the tissue as thin as possible. Cut out a few ghosts for more fun and place them on a flat surface. You might want to make some out of regular paper to compare. (Slightly heavier ghosts easier to control.)
- Blow up the balloon and tie it. Then rub it really fast through your hair for about 10 seconds. This will add a static charge.
- Slowly bring the balloon near the ghost, and the ghost will begin to rise toward the balloon. If the balloon is charged enough, the ghost will rise and float right up to the balloon, even when it is several inches away. With a little practice, you can get the ghost to rise, float, and even dance around.
TIP: The easiest way to make the ghost rise without it sticking to the balloon is to tape the very tip of the bottom of the ghost to a table. The ghost will rise and move along with the balloon. With a good charge, the balloon can control the ghost from several inches away.
How’s it work?
When you rub the balloon through your hair, invisible electrons (with a negative charge) build up on the surface of the balloon. The electrons have the power to pull very light objects (with a positive charge) toward them – in this case, the tissue ghost!